Initial Consultation
The process starts with an initial consultation where you discuss your goals, budget, and any specific requirements with a roofing contractor. This is the ideal time to share any concerns or preferences about materials, design, or warranties. A thorough consultation ensures the project is customized to fit your home’s needs. This step lays the groundwork for success by aligning expectations between you and the contractor. By preparing questions and researching your options in advance, you’ll make this phase more productive and smooth.
Roof Inspection
A professional inspection is conducted to assess the current roof’s condition and to take accurate measurements. Contractors look for underlying issues such as leaks, rotting wood, or structural weaknesses that need to be addressed before installation begins. This step ensures there are no surprises during the project. Detailed measurements also help avoid material shortages or unnecessary waste, keeping the project efficient. Homeowners can prepare by pointing out existing concerns, such as sagging areas or water damage, to assist the contractor.
Choosing Materials
Once the inspection is complete, you’ll work with the contractor to choose the best roofing materials and design for your home. Options include shingles, metal, tiles, and more based on your preferences and local weather conditions. Durability, aesthetics, and budget are important considerations during this phase. Selecting high-quality materials ensures long-term performance and adds curb appeal to your property. Contractors can provide recommendations, but it’s always helpful to research your choices to find the best fit for your needs.
Preparing the Site
Before any installation work begins, the site needs proper preparation. The crew will set up protective barriers, such as tarps or plywood, to shield landscaping, driveways, and outdoor furniture from debris. They’ll also ensure all equipment is in place for safe and efficient work. By taking precautions, contractors minimize potential damage to your property during the roofing process. Homeowners can assist by clearing the area around the house of vehicles, garden ornaments, or other items that could obstruct access.
Removing the Old Roof
The existing roof materials, such as shingles, underlayment, and flashing, are carefully removed to expose the roof deck. This step is noisy and creates debris, but it’s critical for identifying damage hidden beneath the surface. Contractors ensure all waste is safely handled and removed from the site. Proper removal prevents compatibility issues with the new materials and supports structural integrity. Communicating this stage to your neighbors in advance is a good way to maintain friendly relations during the project.
Deck Inspection
Once the old roof is stripped away, the roof deck is thoroughly inspected for rot, water damage, or weak spots. Any necessary repairs or reinforcements are made to restore its strength. This ensures the deck can properly support the layers of materials that will be installed on top. Skipping this step risks compromising the durability of the new roof. Homeowners should prepare for potential surprises by allowing some flexibility in the project timeline and budget for unexpected repairs.
Adding Underlayment
The underlayment, a water-resistant barrier, is installed over the roof deck to protect it from moisture and potential leaks. This step is critical for ensuring the longevity of the roofing system. It acts as a second line of defense against weather, especially in areas prone to heavy rain or snow. High-quality underlayment also improves the roof’s overall durability. To optimize protection, contractors choose underlayment that matches the roofing materials and the climate of the region.
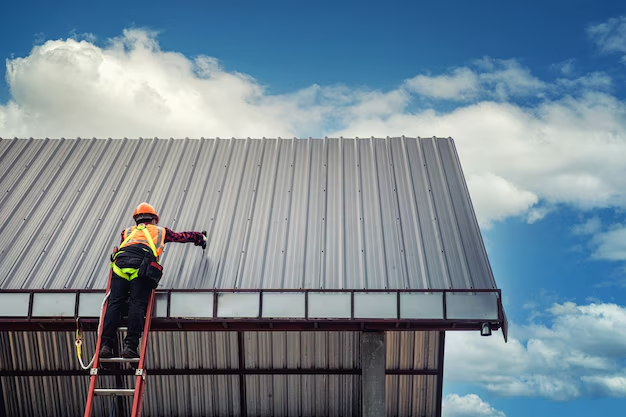
Installing New Materials
The selected roofing materials, such as shingles, metal panels, or tiles, are securely installed over the underlayment. This phase requires precision and attention to detail to ensure all components fit correctly and align properly. The new materials serve as the main shield against weather elements, so the installation must be thorough. Proper techniques ensure the roof will adhere to manufacturer warranties and last its full lifespan. Regular communication with the contractor during this stage can keep homeowners informed on progress.
Flashing Installation
Flashing, typically made of metal, is applied around vulnerable areas like chimneys, vents, and valleys to prevent water infiltration. This step is crucial for protecting these spots, which are prone to leaks. Properly installed flashing seals gaps and aids in directing water away from the roof. Professional installation ensures these areas remain watertight and resistant to damage over time. Homeowners can verify with the contractor that all critical areas are adequately sealed as part of the finished work.
Final Inspection
After installation, a thorough inspection is completed to ensure all elements of the roof meet quality standards and local building codes. Your contractor will review the finished roof with you, addressing any last-minute concerns and providing maintenance tips. This final walkthrough confirms the roof’s readiness to provide long-term protection. Additionally, warranties for materials and labor may be discussed at this stage. Being present during the final inspection allows homeowners to confirm all expectations have been met.